Basic UI Plugins
This guide explains how to create a basic UI plugin based on the new front-end extensions paradigm.
Version 1. Simple plugin
Source branch with the example project: example/basic-plugin.
Every TeamCity UI plugin must contain at least two files: the controller itself (.java), and the resource JSP file. Every time we create a plugin, we create a relation between the PlaceID and plugin resources. Using the TeamCity Open API, we let the TeamCity Core know, that there is a newly registered plugin for a certain PlaceID. Whenever TeamCity encounters this PlaceID in the JSP/TAG source code, it renders the plugin content.
To start the tutorial, open the src/main/java/com/demoDomain/teamcity/demoPlugin/controllers/SakuraUIPluginController.java file from the example project.
Here you see the boilerplate code where the controller constructor creates a SimplePageExtension instance:
This piece of code does the following:
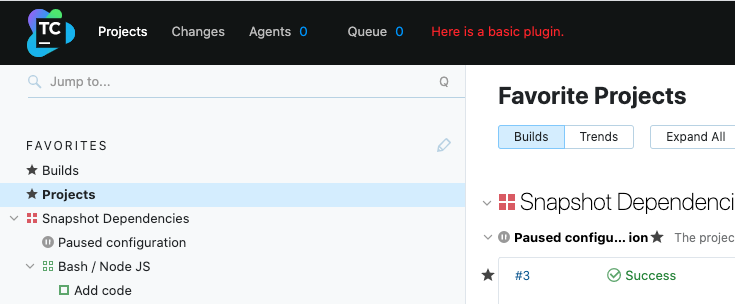
1\. It tells the TeamCity Core, that the plugin should be placed in SAKURA_BEFORE_CONTENT and PlaceId.BEFORE_CONTENT. To understand where those placeIds are - open your TeamCity instance with the GET parameter pluginDevelopmentMode=true. In our case, this is a localhost instance.
The PlaceID in the Sakura UI:

PlaceID in the classic UI:

2\. The UI plugin will be named as it is defined in the private constant PLUGIN_NAME.
3\. This plugin uses basic-plugin.jsp as an entry point. Next time Plugin Wrapper will try to load your plugin, it will request [server]/plugins/SakuraUI-Plugin/basic-plugin.jsp as an entry point.
4\. This plugin should load basic-plugin.css:
You can compile your plugin using the Intellij IDEA run configuration Build Plugin or using the CLI command:
After a few seconds, Maven will output a PROJECT_ROOT/target/demoPlugin.zip file. Now you should simply add the plugin via the Administrator Panel in TeamCity.
That’s it. Your basic plugin is ready!

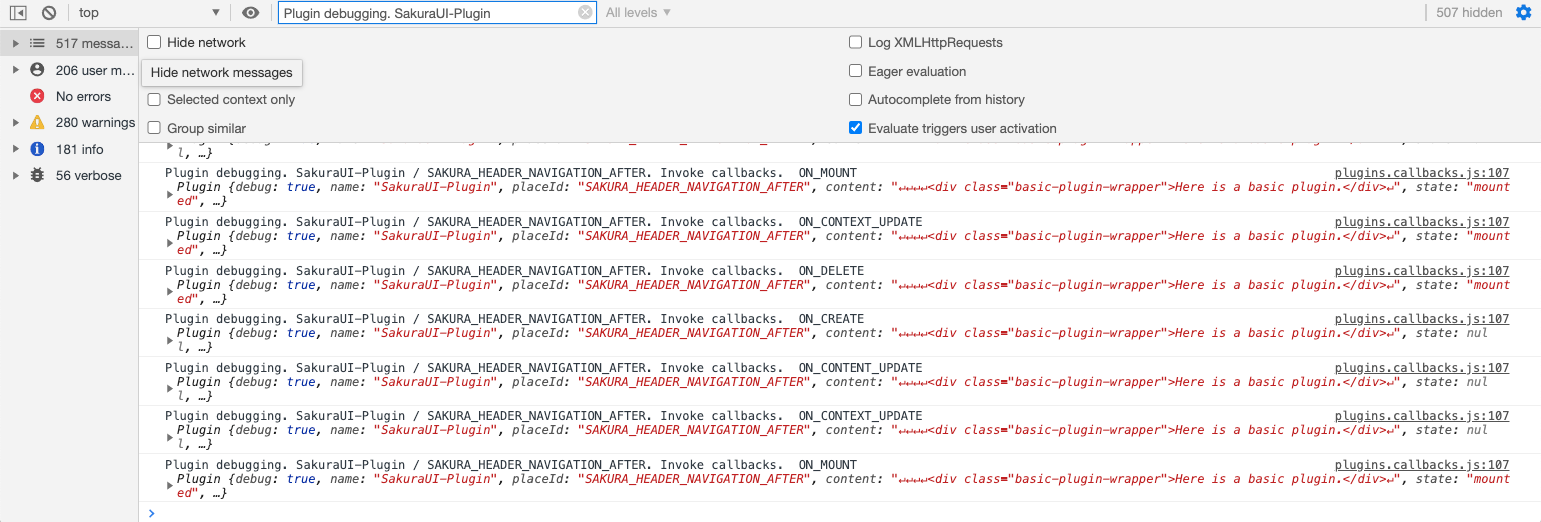
This is a perfect place to pause and explore how the plugin works under the hood. Open the page one more time with pluginDevelopmentMode=true and then open Browser Developer Tools. You will see a lot of debugging information for your plugin.
Usually, a plugin goes through 4 lifecycle events:
ON_CREATE– internal phase when TeamCity Core requests the plugin metadata such as a Plugin Controller URL, attached CSS/JS files, parsed JS/CSS.ON_CONTENT_UPDATE– during this phase, Plugin Wrapper takes the content from the JSP file and puts it in a separate HTML container.ON_CONTEXT_UPDATE– this event fires every time a plugin receives new Plugin UI Context. In our case, it receives it for the first time.ON_MOUNT– invokes when an HTML content is attached to the DOM.

Let's go further. If you navigate to another TeamCity project / build configuration, you will notice that the plugin disappeared and then appeared again. At the same time, a few more lifecycle events will have appeared in the console:

ON_CONTEXT_UPDATE– because you changed the navigation Context.ON_DELETE– this phase is opposite to theON_CREATEphase. During this phase, Plugin Wrapper removes the plugin from the Plugin Registry and removes the HTML elements for the plugin.
Then follow ON_CREATE, ON_CONTENT_UPDATE, ON_CONTEXT_UPDATE, ON_MOUNT, and so on. Every time you change the location, the plugin is constructed from a scratch, by passing through the same steps.
Version 2. Using PluginUIContext
Source branch with the example project: example/basic-plugin-v2.
The basic plugin we wrote in the first part does not provide many benefits, unless your only goal is to draw some constant text. In most cases, a plugin should react to user actions and provide useful information about the currently selected entity, whether it is a build configuration ID, project ID or other IDs. The data we use to populate the HTML elements is called a Model. When we used a basic plugin v.1, we had an empty Model. Let's explore how TeamCity OpenAPI helps you to pick any data which TeamCity knows about the entity from the model: dependent builds, committers, changes, names, and so on.
To start the tutorial, open the src/main/java/com/demoDomain/teamcity/demoPlugin/controllers/SakuraUIPluginController.java file from the example project.
The important change is: now SakuraUIPluginController extends BaseController. It allows the plugin to override the doHandle method. This is how the Controller gets access to a request data.
There are key updates in this code:
Instead of
basic-plugin.jsp, we use/demoPlugin.htmlas an entry point. This configures the plugin to register a controller at[server]/demoPlugin.html.Every time a request comes to
/demoPlugin.html, the methoddoHandleintercepts this request and processes it.To prepare data for the plugin, we have to understand what UI is used. To do so, you can use
WebUtil.sakuraUIOpened. In the next releases we will unify this approach to form an input data using only one method.The plugin creates
ModelAndViewand passes the link to the View container. It's the same JSP file we used before.The
PluginUIContextcontroller parses the request parameters for the Sakura UI, or we takeBuildTypeIddirectly from theGETlist for the Classic UI.If
buildTypeIdis not empty, we ask the Core to find the build configuration data.The plugin controller passes the build type to a JSP in a variable called
buildTypeand returns the result a line after.
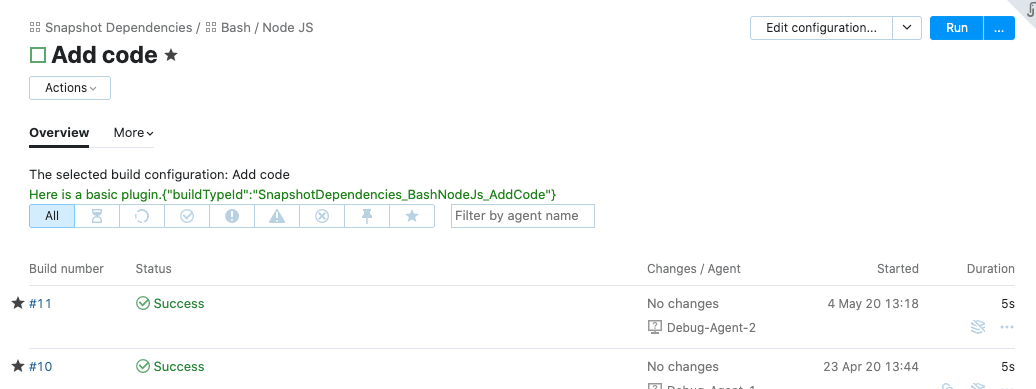
There is also a slight change in JSP. If there is a build configuration, we show its name:
Let's compile and update the plugin and then open any build configuration page:

It works the same as the previous basic (simple) UI plugin, but now it contains the data from the TeamCity database.
Basic vs. controlled plugins
In many cases, a basic plugin is already good enough: it integrates with the Sakura UI and with the Classic UI, it could be enriched with the backend, and it reacts to any context updates. If you had been writing TeamCity UI plugins before 2020.2, you may notice that the major changes are PlaceID and the new PluginUIContext. If you have your own plugin, we recommend updating it in the same manner as shown in the tutorial and, most probably, it will become Sakura-ready.
With basic plugins, we provide a way to integrate plugins in the Sakura UI with minimum effort.
However, its functionality can be quite limited. If you use your plugin in the header, you will observe layout shifting. If you use JavaScript to enrich the default plugin behaviour - it's not clear in what moment you should add the event handlers. There are some workarounds: for example, to check the DOM every few seconds, or use Mutation Observer. These methods have their limitations and it is better to avoid some of them in production. Another weak side of Basic plugins: they are requested on every navigation event and pass the entire lifecycle.
Let's consider the following case: you send a request that should update the plugin content, but during the request execution you moved from one build configuration to another. If you don't cancel the promise handling, it will be resolved and, depending on the logic and race conditions, the browser might receive a newly generated plugin, filled with data from the previous request.
Controlled plugins allow you to address all these issues and provide many more possibilities.